
Connecting Time Tagger via USB Port
Learn how to troubleshoot and verify the USB connection between your Time Tagger and PC.
Time Tagger Ultra and Time Tagger X support USB3 connection, while Time Tagger 20 uses USB2. Always connect your Time Tagger to a port matching its supported USB version using a high-quality cable, preferably the one provided with the product. This helps prevent connection issues between the Time Tagger and the PC.
Troubleshooting a Slow or Failed USB Connection
Since Time Tagger Ultra and Time Tagger X are designed for USB3, plugging them into a USB 2.0 port instead of a USB 3.0 port will slow down data transfer. In this case, the Time Tagger software reports a warning that the device is connected via USB 2.0 and will run at reduced performance.
A different, more severe error, such as the one shown below, can point to a faulty USB cable or port, or an issue with the Time Tagger itself:

Troubleshooting Checklist
If you continue to experience connection issues, work through the following checks:
Are you using the original USB cable that came with your Time Tagger? For reference:
- Time Tagger 20: USB-A to USB-B cable, USB 2.0
- Time Tagger Ultra: USB-A to USB-B cable, USB 3.0
- Time Tagger X: USB-C to USB-C cable, USB 3.2
If you are not using the original cable, try a different high-quality USB cable of the correct version.
Try connecting the Time Tagger to a different USB port on the PC. Does this change the result?
Unplug the Time Tagger, reboot the PC, and reconnect the Time Tagger afterward.
Test the Time Tagger on a different PC. Does the issue persist there as well?
In each of the configurations above, check whether the device is visible in the USB tree viewer below; it should appear under the name Opal Kelly.
Check Device Manager: the Time Tagger should be listed under “FrontPanel devices”. If it instead appears under “Other devices” as an “Opal Kelly XEM” device, right-click it, select Update Driver, and choose “Search automatically for drivers.”
If none of these steps resolve the issue, please contact our support team at support@swabianinstruments.com with the results of the checks above.
Verifying the USB Connection
You can verify the USB connection between the Time Tagger and your PC by using a USB tree viewer, e.g., USB Device Tree Viewer. The Time Tagger will appear as an Opal Kelly device, highlighted at its port under the corresponding USB controller in the picture below.
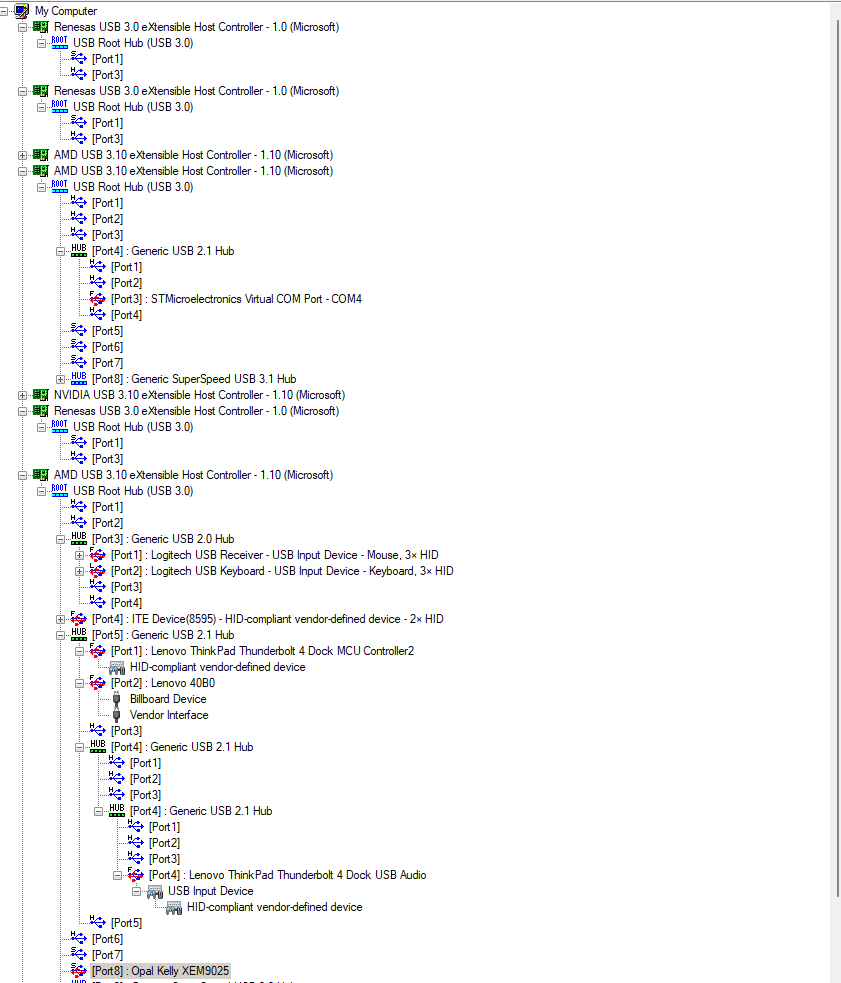
Please note that USB controllers can differ in their data transfer capabilities. Although a USB 3.0 controller supports a maximum bandwidth of 5 Gbps, some ports on the controller may operate at USB 2.0 speeds (480 Mbps). For Time Tagger Ultra and Time Tagger X, it is important to ensure the device is connected to a port that supports the correct speed to avoid performance limitations.
Connecting Multiple Time Taggers
When connecting several Time Tagger Ultra or Time Tagger X units to the same PC, the bandwidth of the shared USB controller becomes important, since it is split between all connected devices. For setups that require guaranteed bandwidth per device, such as synchronized measurements, we recommend using a dedicated multi-port USB3 controller card instead of a shared hub. For general guidance on hubs, docking stations, and extenders that preserve full transfer performance, see our Recommended USB Accessories article.